
Complex Project!
Marketing Automation
Reducing manual work and improving conversion outcomes for thousands of operators
Product Architecture
Design Systems
User Research
Technical Project
Project Summary
I greatly expanded on Tenant inc.'s current automation tool to create a powerful marketing automation feature for self storage operators. My goal throughout this project was to bring complex systems forward and give the user full power over the tech. I crafted not only the visual and interactive aspects but also the underlying logic and behavior that drives the automation. This marketing tool is focused on creating seamless interactions and communications with customers that ultimately lead to conversions.
Tools like HubSpot or Mailchimp, though powerful, are too broad and require external management. These solutions often fall short for storage managers' specific needs. This tool's strength lies in its seamless integration with self-storage operations, eliminating the need for multiple disconnected systems and providing a tailored solution within Tenant inc.'s ecosystem.
The Solution
Automation to drive conversions & sales
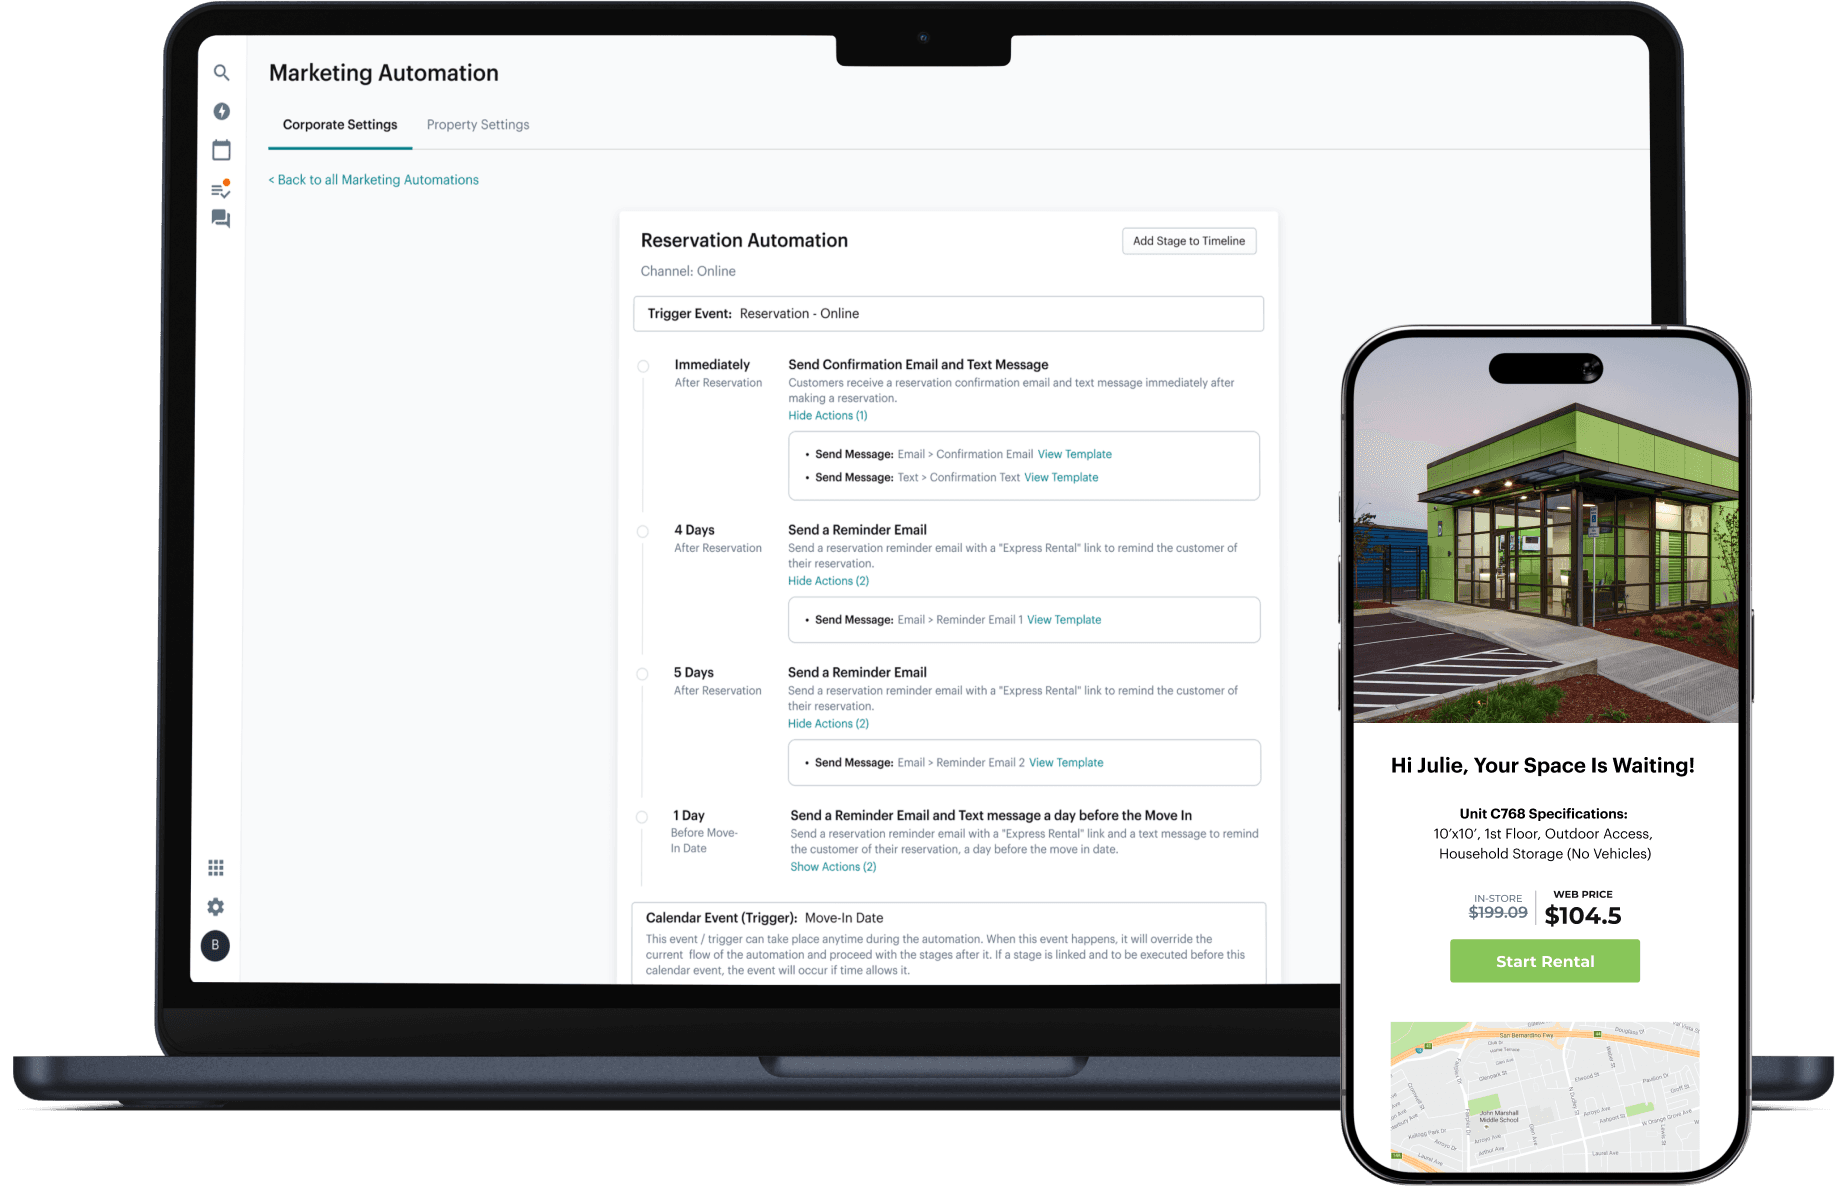
While in action, the automation sets up specific interactions between new leads & storage operators to drive conversions. Companies can then customize this automation to fit their unique business processes. In this workflow the automation is set to run for 5 days in which a lead will receive crafted emails, text, and calls.


Simplifying Complexity For Effortless Use.
The Challenge
How much control should be given to users over this complexity?
In my design process, I prioritized finding the right balance in user control over this automation tool. My goal was to prevent users from feeling overwhelmed by complexity while avoiding the pitfalls of oversimplification that could restrict their control. As a designer I wanted to keep users informed and engaged while maintaining an intuitive tool.
Research
To understand what automation meant to storage operators, I conducted a competitive analysis of both indirect and direct competitors. I discovered that our direct competitors' automation tools primarily focus on the delinquency process within a tenant's rental cycle. Meanwhile, indirect competitors like Zapier, Mailchimp, and HubSpot set the standard for marketing automation.
Key findings from the research:
The self-storage industry lacks a powerful marketing tool integrated within their Property Management Systems (PMS).
While indirect competitors excel at marketing automation, they require additional external software to truly automate and manage the entire business operation effectively.
Design Process
To design the right tool for storage operators I needed to deeply understand the lead’s journey end to end. The goal for operators is to deliver tailored content, personalized emails, and targeted interactions to ensure each lead receives the right message at the right time. I achieved this goal within my design process by:
1. Mapping the lead’s journey and identify key triggers.
2. Creating a flexible automation timeline with stages linked to actions and events.
3. Designing a seamless process from lead to customer.
Throughout my process I also created multiple flowcharts that I handed off to the dev team, which helped us align on backend logic and expected behavior. These visuals were incredibly useful for explaining the project to stakeholders, making it easy to highlight the big ideas and get everyone on the same page.

Lead's Journey
Tailored Content For Each Rental Journey
For example, a lead is anyone who hasn’t rented a storage unit but shared their contact info with us. Leads can come from different starting points, which might need unique automation workflows, we refer to these as channels - like online, in- store, or through a call center. Based on their actions, leads can trigger different automated workflows. For instance, if someone exits the online rental process without completing a payment, it could trigger a “Cart Abandonment” automation designed to re-engage them.
Quick Start
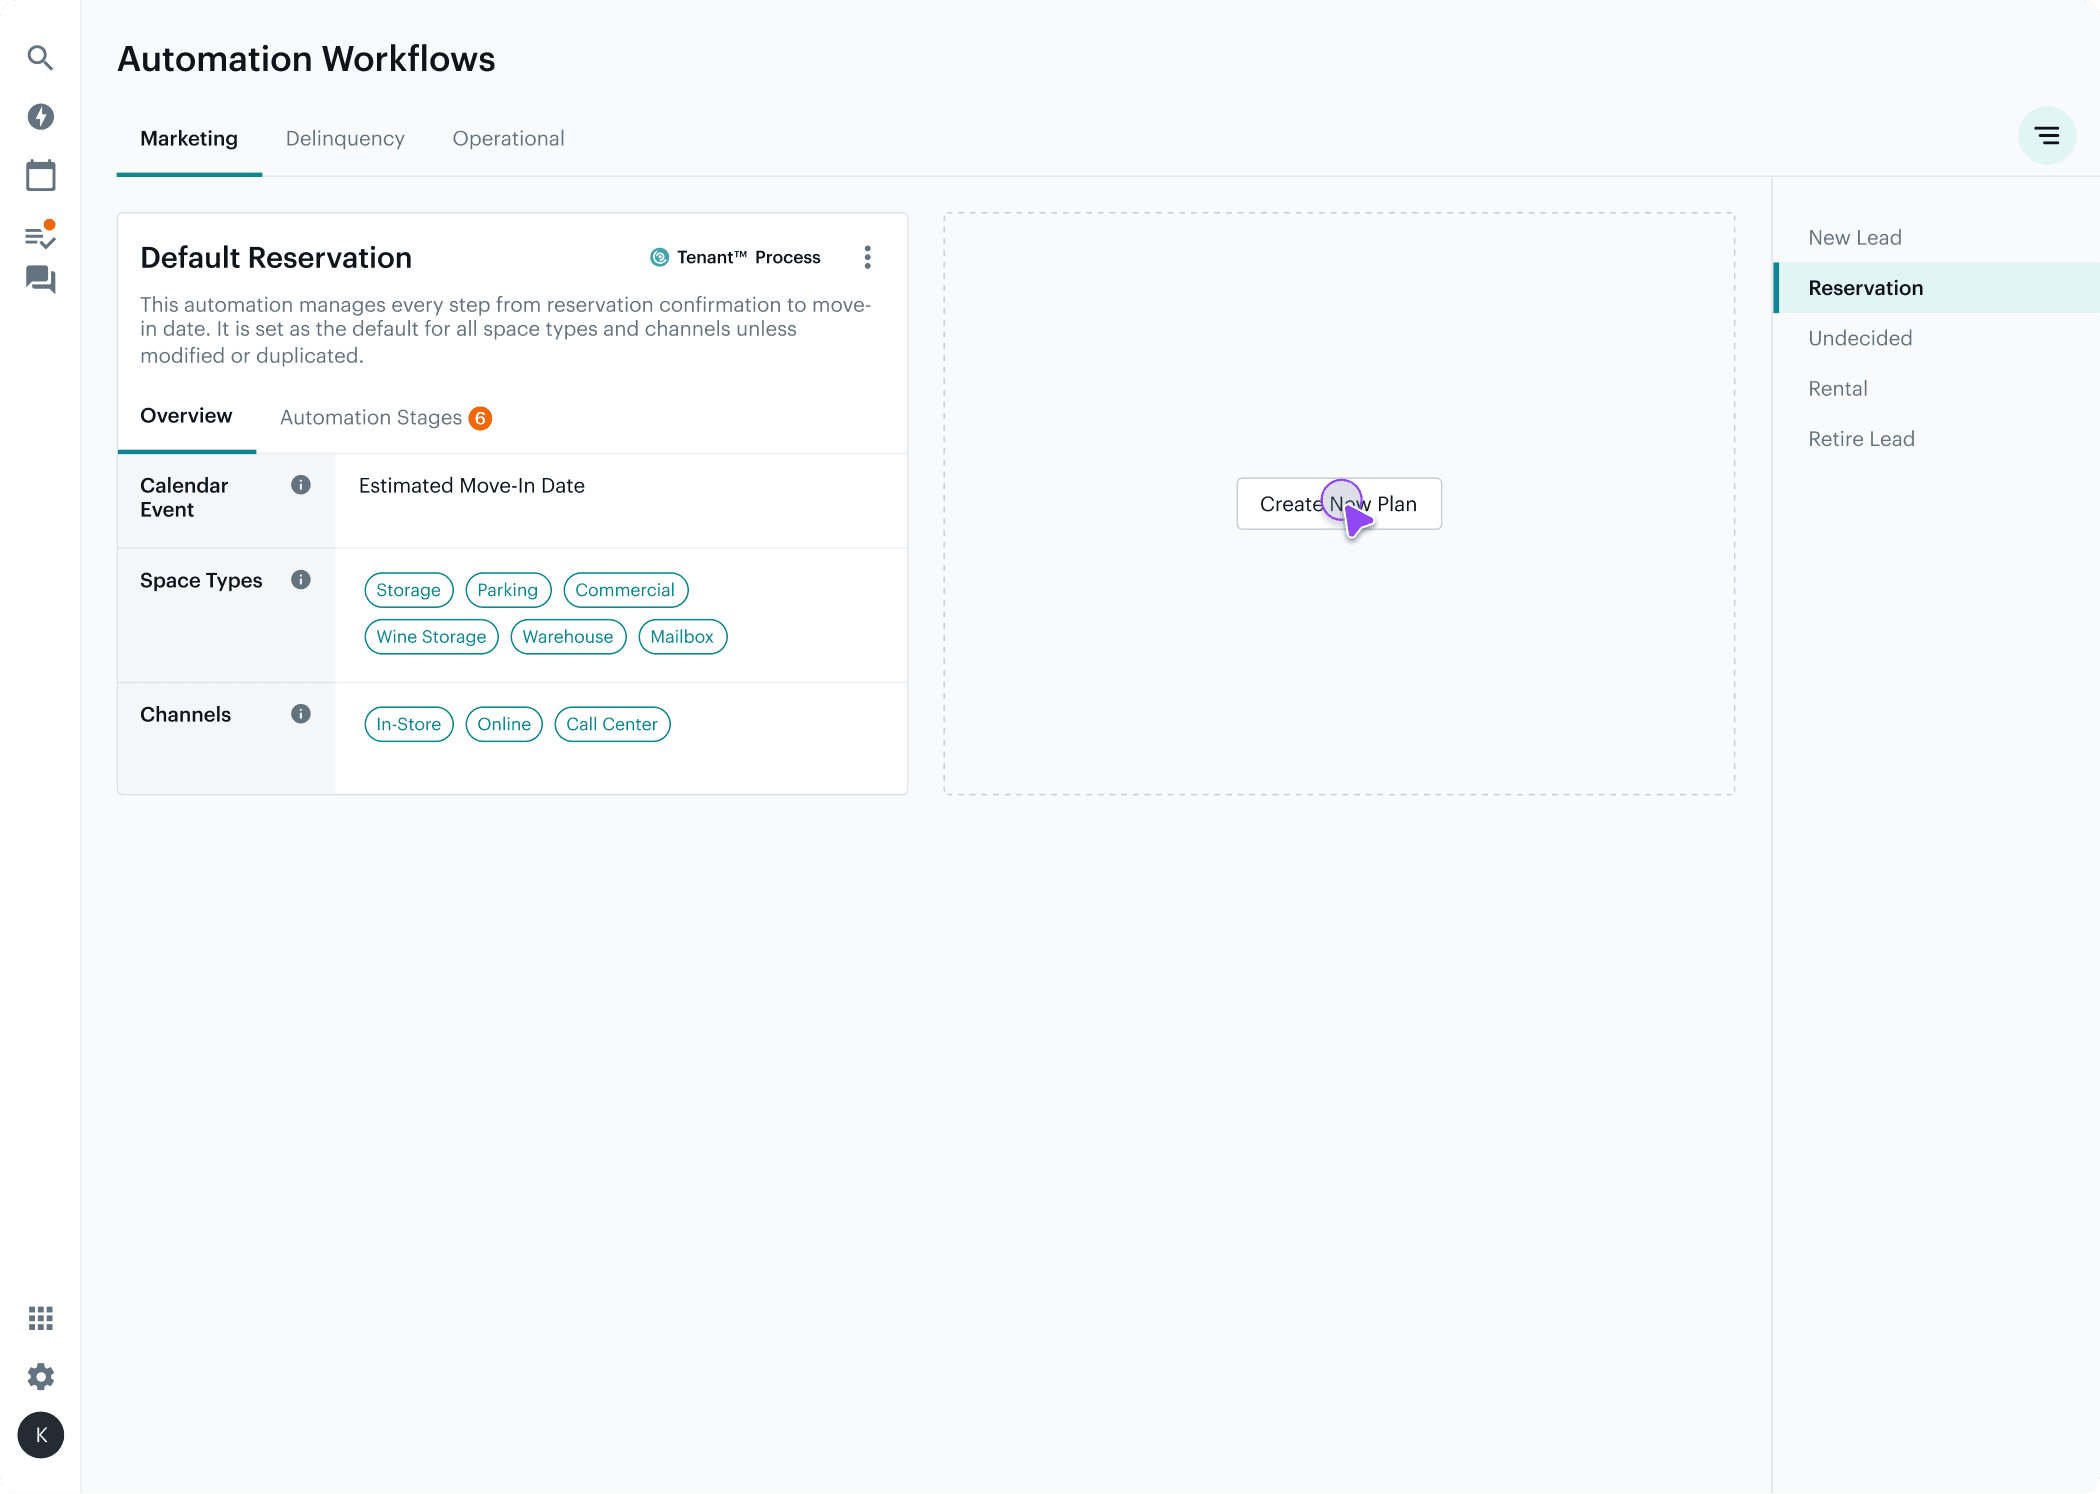
When a user logs on for the first time they will see an automation plan for each trigger, thats so our users don’t have to struggle to get off the ground. These plans are called 'Tenant Process' and are customizable. This one size fits all approach was designed so that the user is not overwhelm by a blank screen, or by the endless possibilities in which an automation can be set up. The example below show how a manager might go about adding a stage to the Tenant Process reservation automation.


New Automation
To reduce cognitive load and help users get started quickly, I chose to not expose certain complexity when creating a new automation. Users can also start with an existing automation and its interactions, making it easier to edit as needed instead of building from the ground up.
What Are Space Types?
Space types refer to the different storage units a person can rent. For example, if someone needs to store a vehicle, they might rent a parking space.
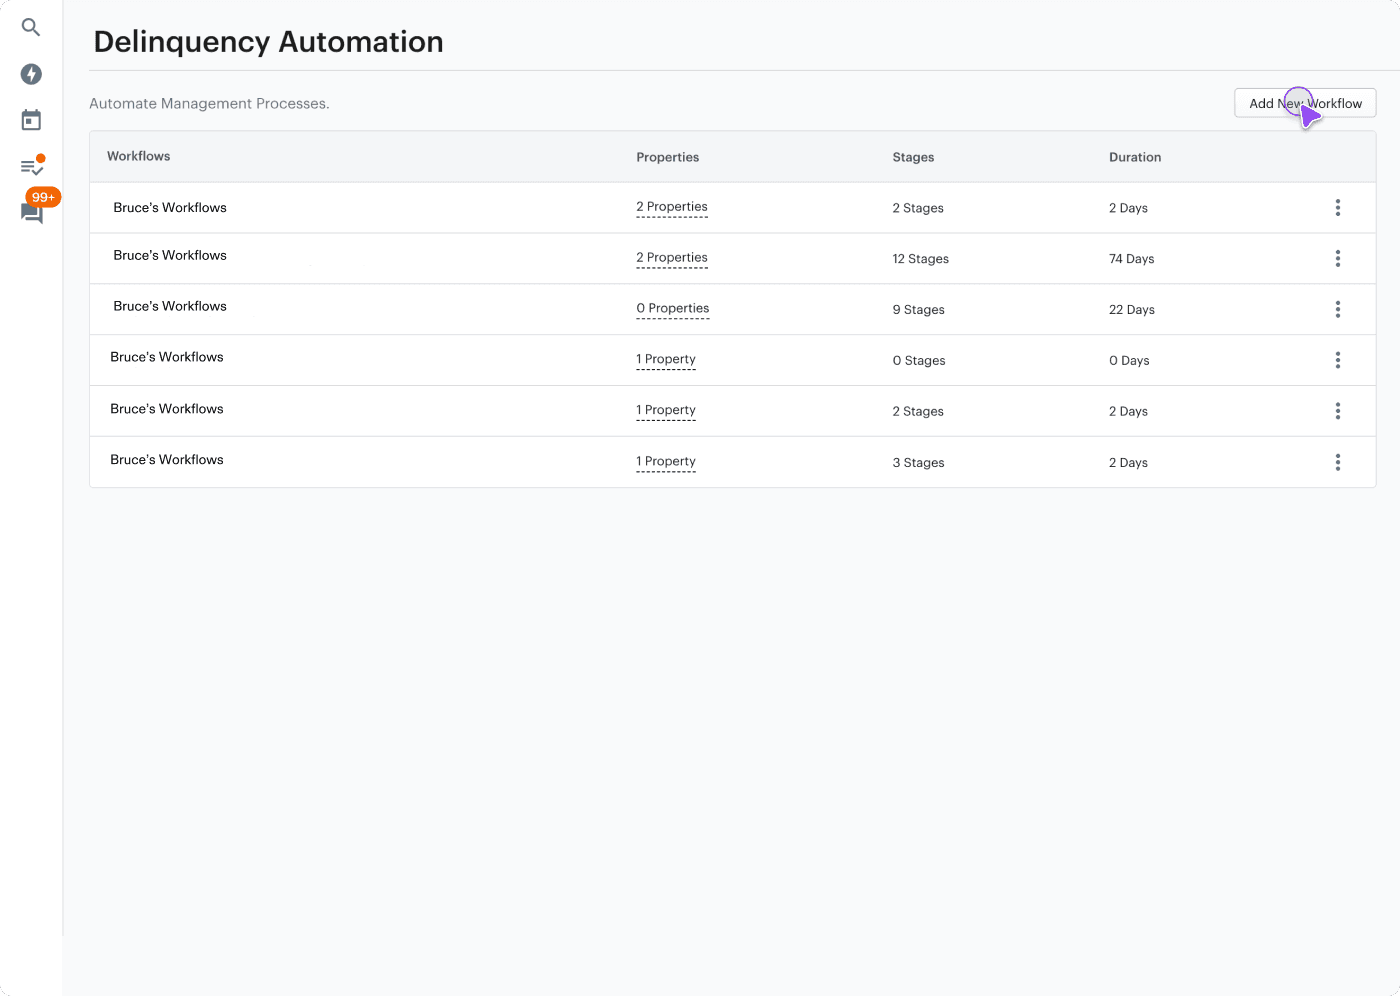
The second image shows the older design. Instead of using a table to view the automation plans I used compact cards to better visualize and differentiate the information.
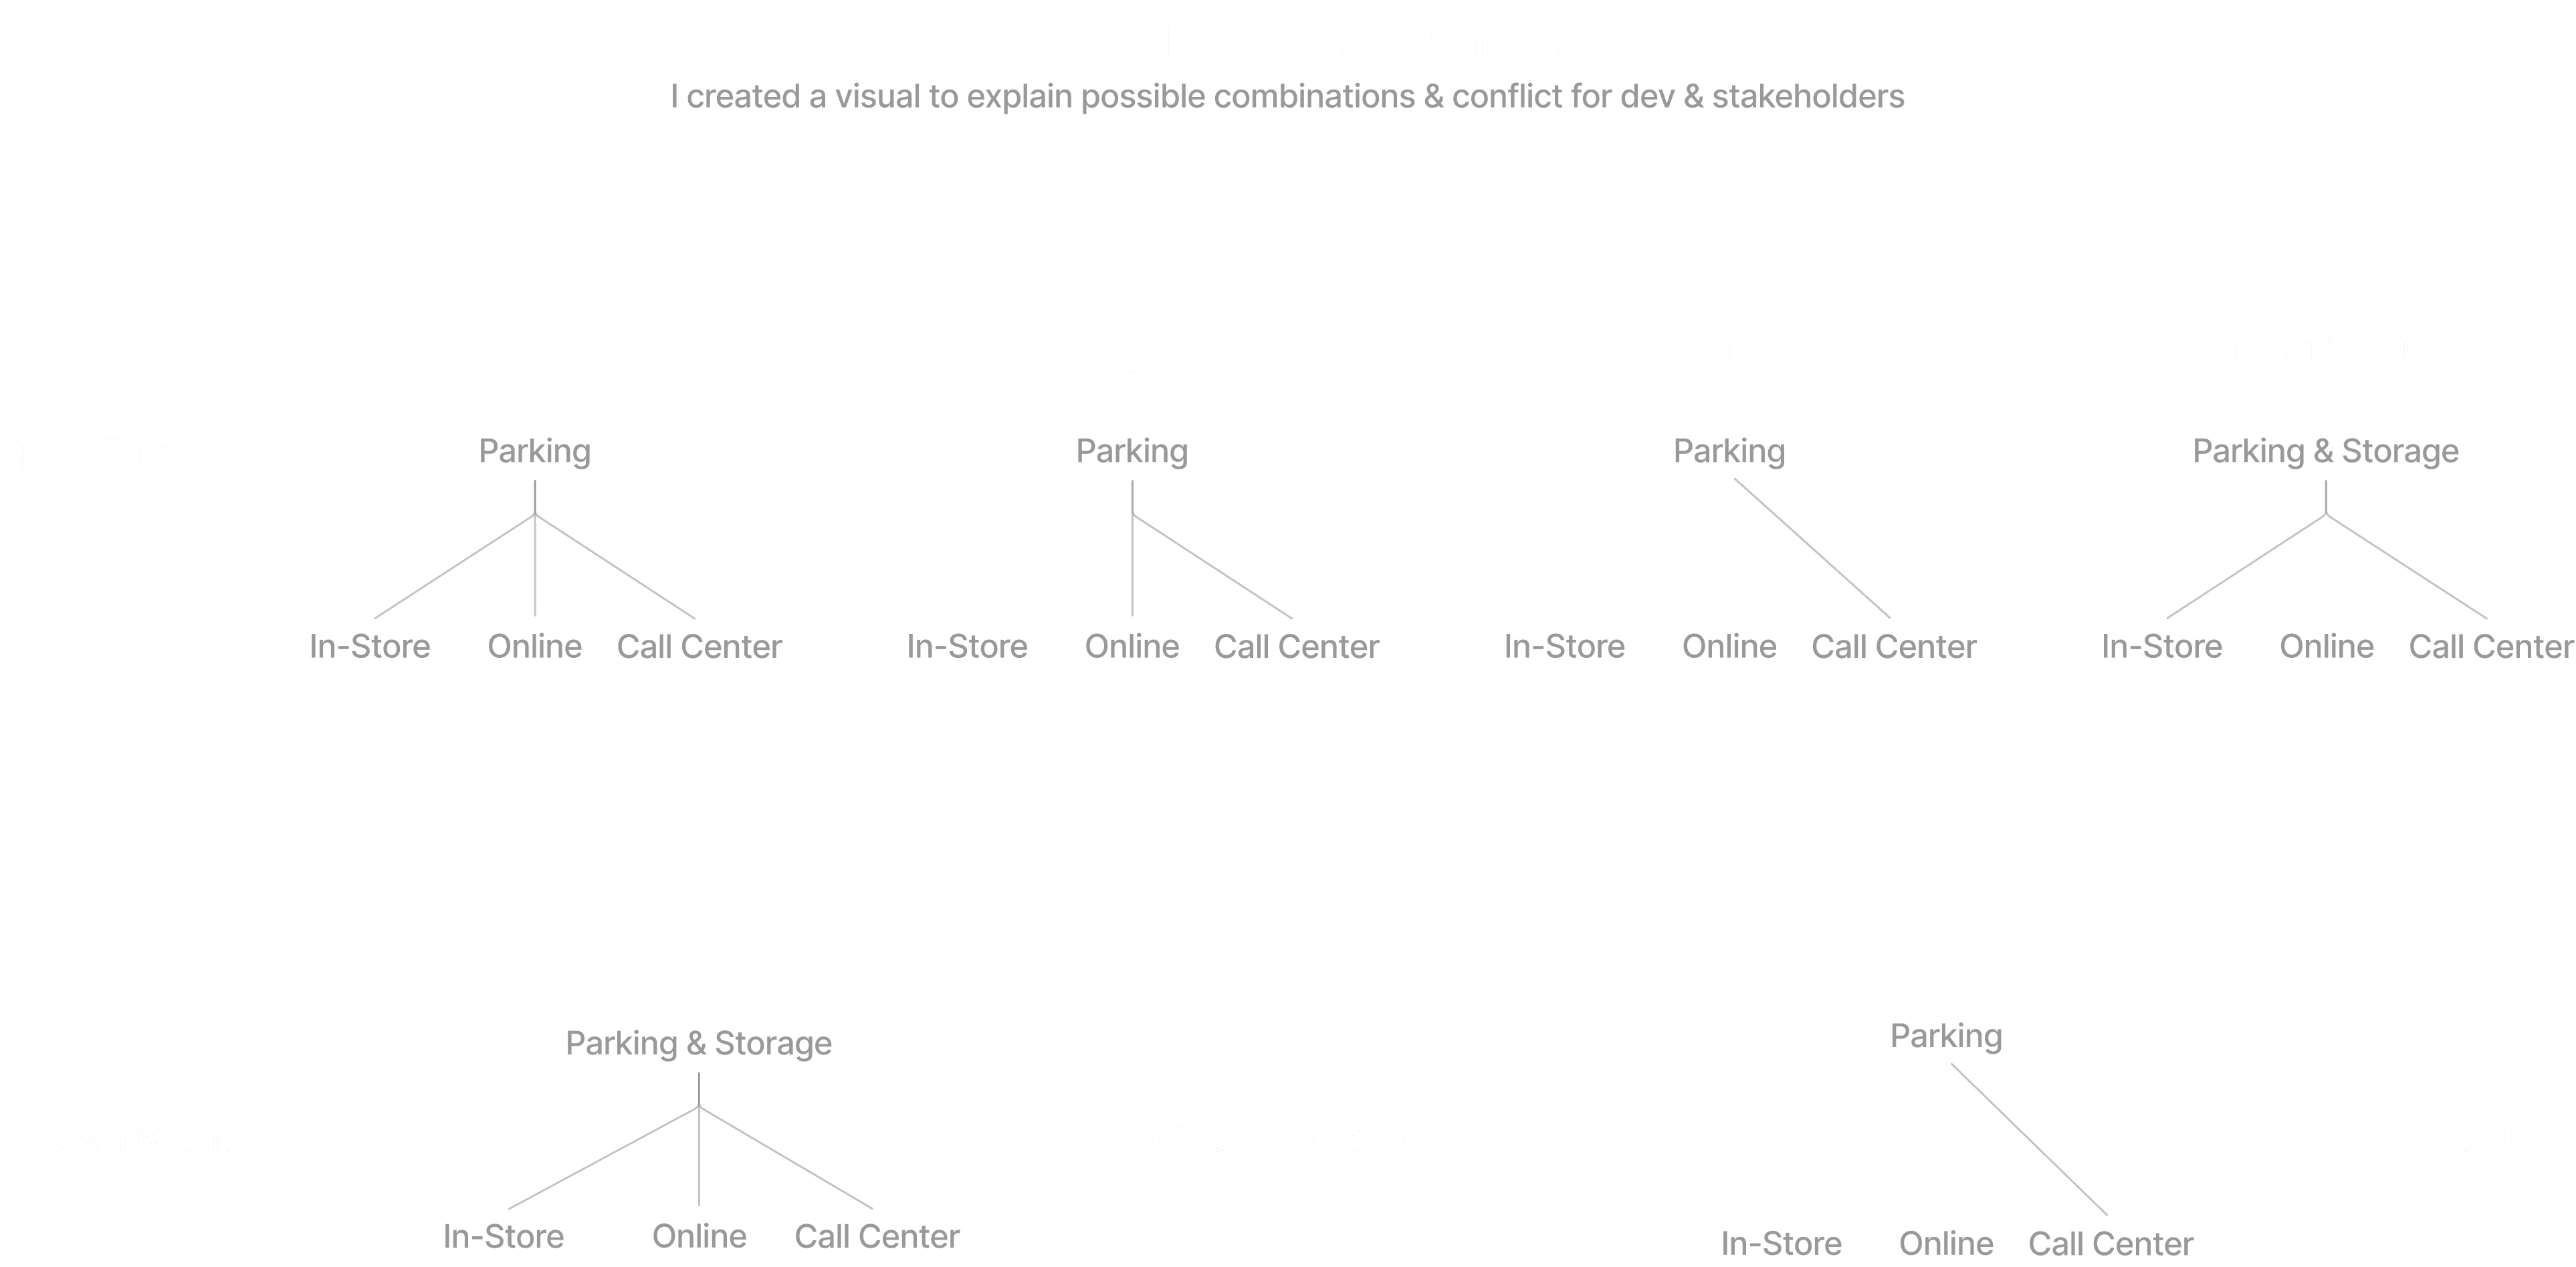
Conflicting Combinations
Users can select multiple space types and channels for a single automation. This can lead to conflicts, as the system won’t know which automation to follow if two are instructing it to perform different workflows.
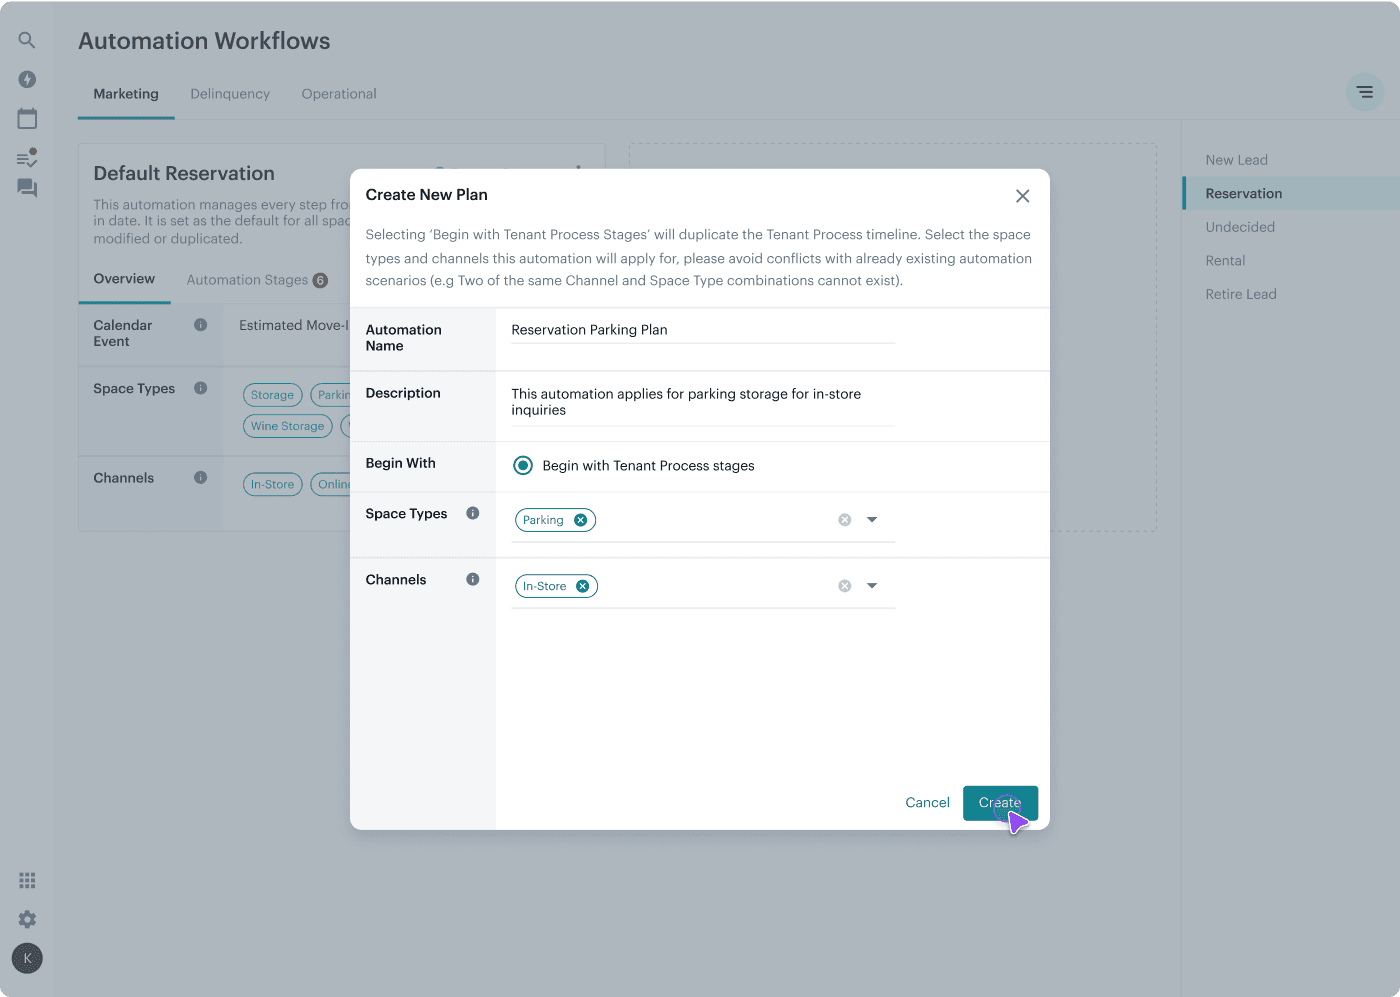
If a user enters a combination that already exists, we notify them of the error and indicate where it’s located. For example: ‘This combination of space types and channels already exists in the “Online Rentals Workflow” automation.
Systems design & Architecture
Designed to be flexible.
The timeline was designed to be highly flexible—capable of handling a wide range of use cases, dependencies, and branching logic. Its modular structure allows operators to link stages and customize workflows to fit their unique lead strategies.


Linking to the main trigger &
1 stage to a previous action
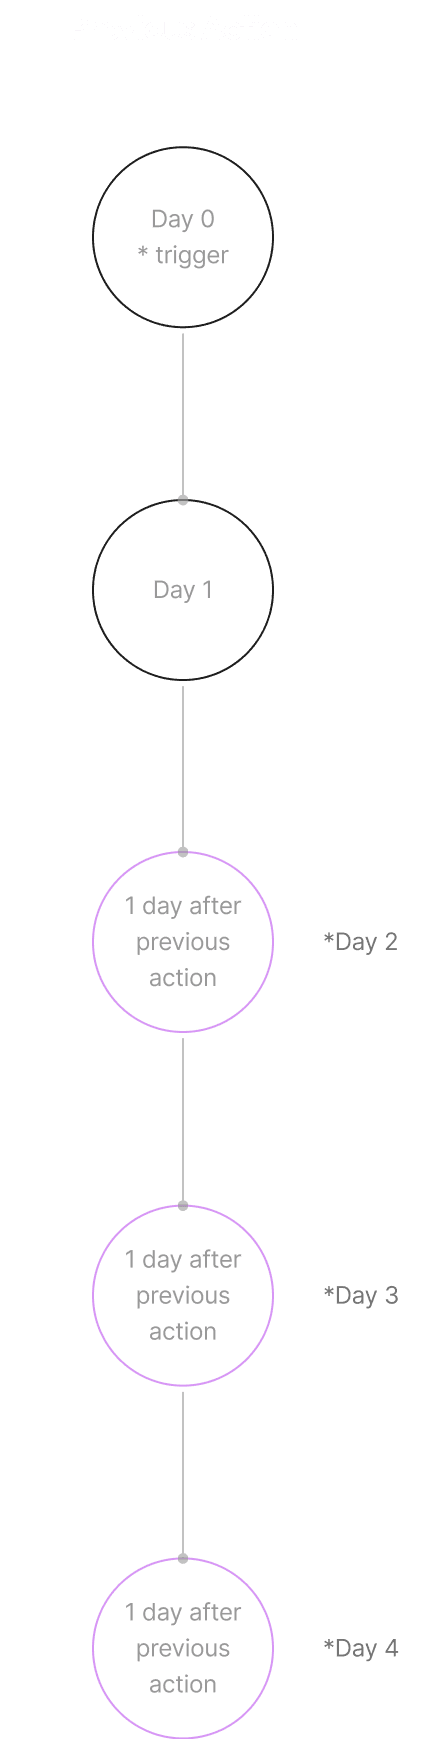
An automation that is only linked to the main trigger will tell the backend that there is no connection between the stages, meaning each stage operates independently without relation to one another. The viewer will still see the stages in chronological order, based on the main trigger. However, if a stage is linked to the action of another stage, the timeline will no longer follow a strict chronological order
Stages linked to a previous actions
Linking to previous actions is very useful when setting up the tenant delinquency process, as certain legal steps may need to occur before advancing to the next stage. These actions should be tied together, so instead of displaying the timeline in chronological order, the viewer will see stages linked to specific actions. For example, a stage might display “1 Day after ” rather than “Day 5,” that is referencing the main trigger event.

Linking to a calendar event
When a customer reserves a storage unit, they select a move-in date that servers as a new triggers in our automation process. This adds complexity since the move-in date they selected can occur at any time. If a customer indicates they’ll move in 4 days, the automation will adjust itself to skip ahead to the stages that follow this event. For instance, if the automation is currently on day 4 out of 12, it will jump to the steps related to the move-in date, even if it hasn’t completed the earlier stages.
Design System
Timeline Component
I created a timeline component that can be used across the software, not just for this process but anywhere time and actions need to be visualized. The challenge was creating a flexible structure that could adapt to various future use cases, even those that I currently did not know.


Stage Functionality
I designed this component using a modular building block approach, where a single ‘stage’ element is continuously stacked to form the complete timeline. The ‘stage’ is both responsive and flexible, allowing it to adapt across different layouts and devices. By applying atomic design principles, I broke down the component’s structure into its simplest elements, ensuring scalability and ease of use while maintaining a cohesive and dynamic design.
Dev Handoff
I guided the development team through the component, explaining
its purpose in detail. I broke down
its states, anatomy, spacing, and expected behavior, while addressing any questions they had along the way. Throughout the development process, we maintained open communication to test its functionality and ensure its quality, working together to make sure the coded component was aligned with the design vision.
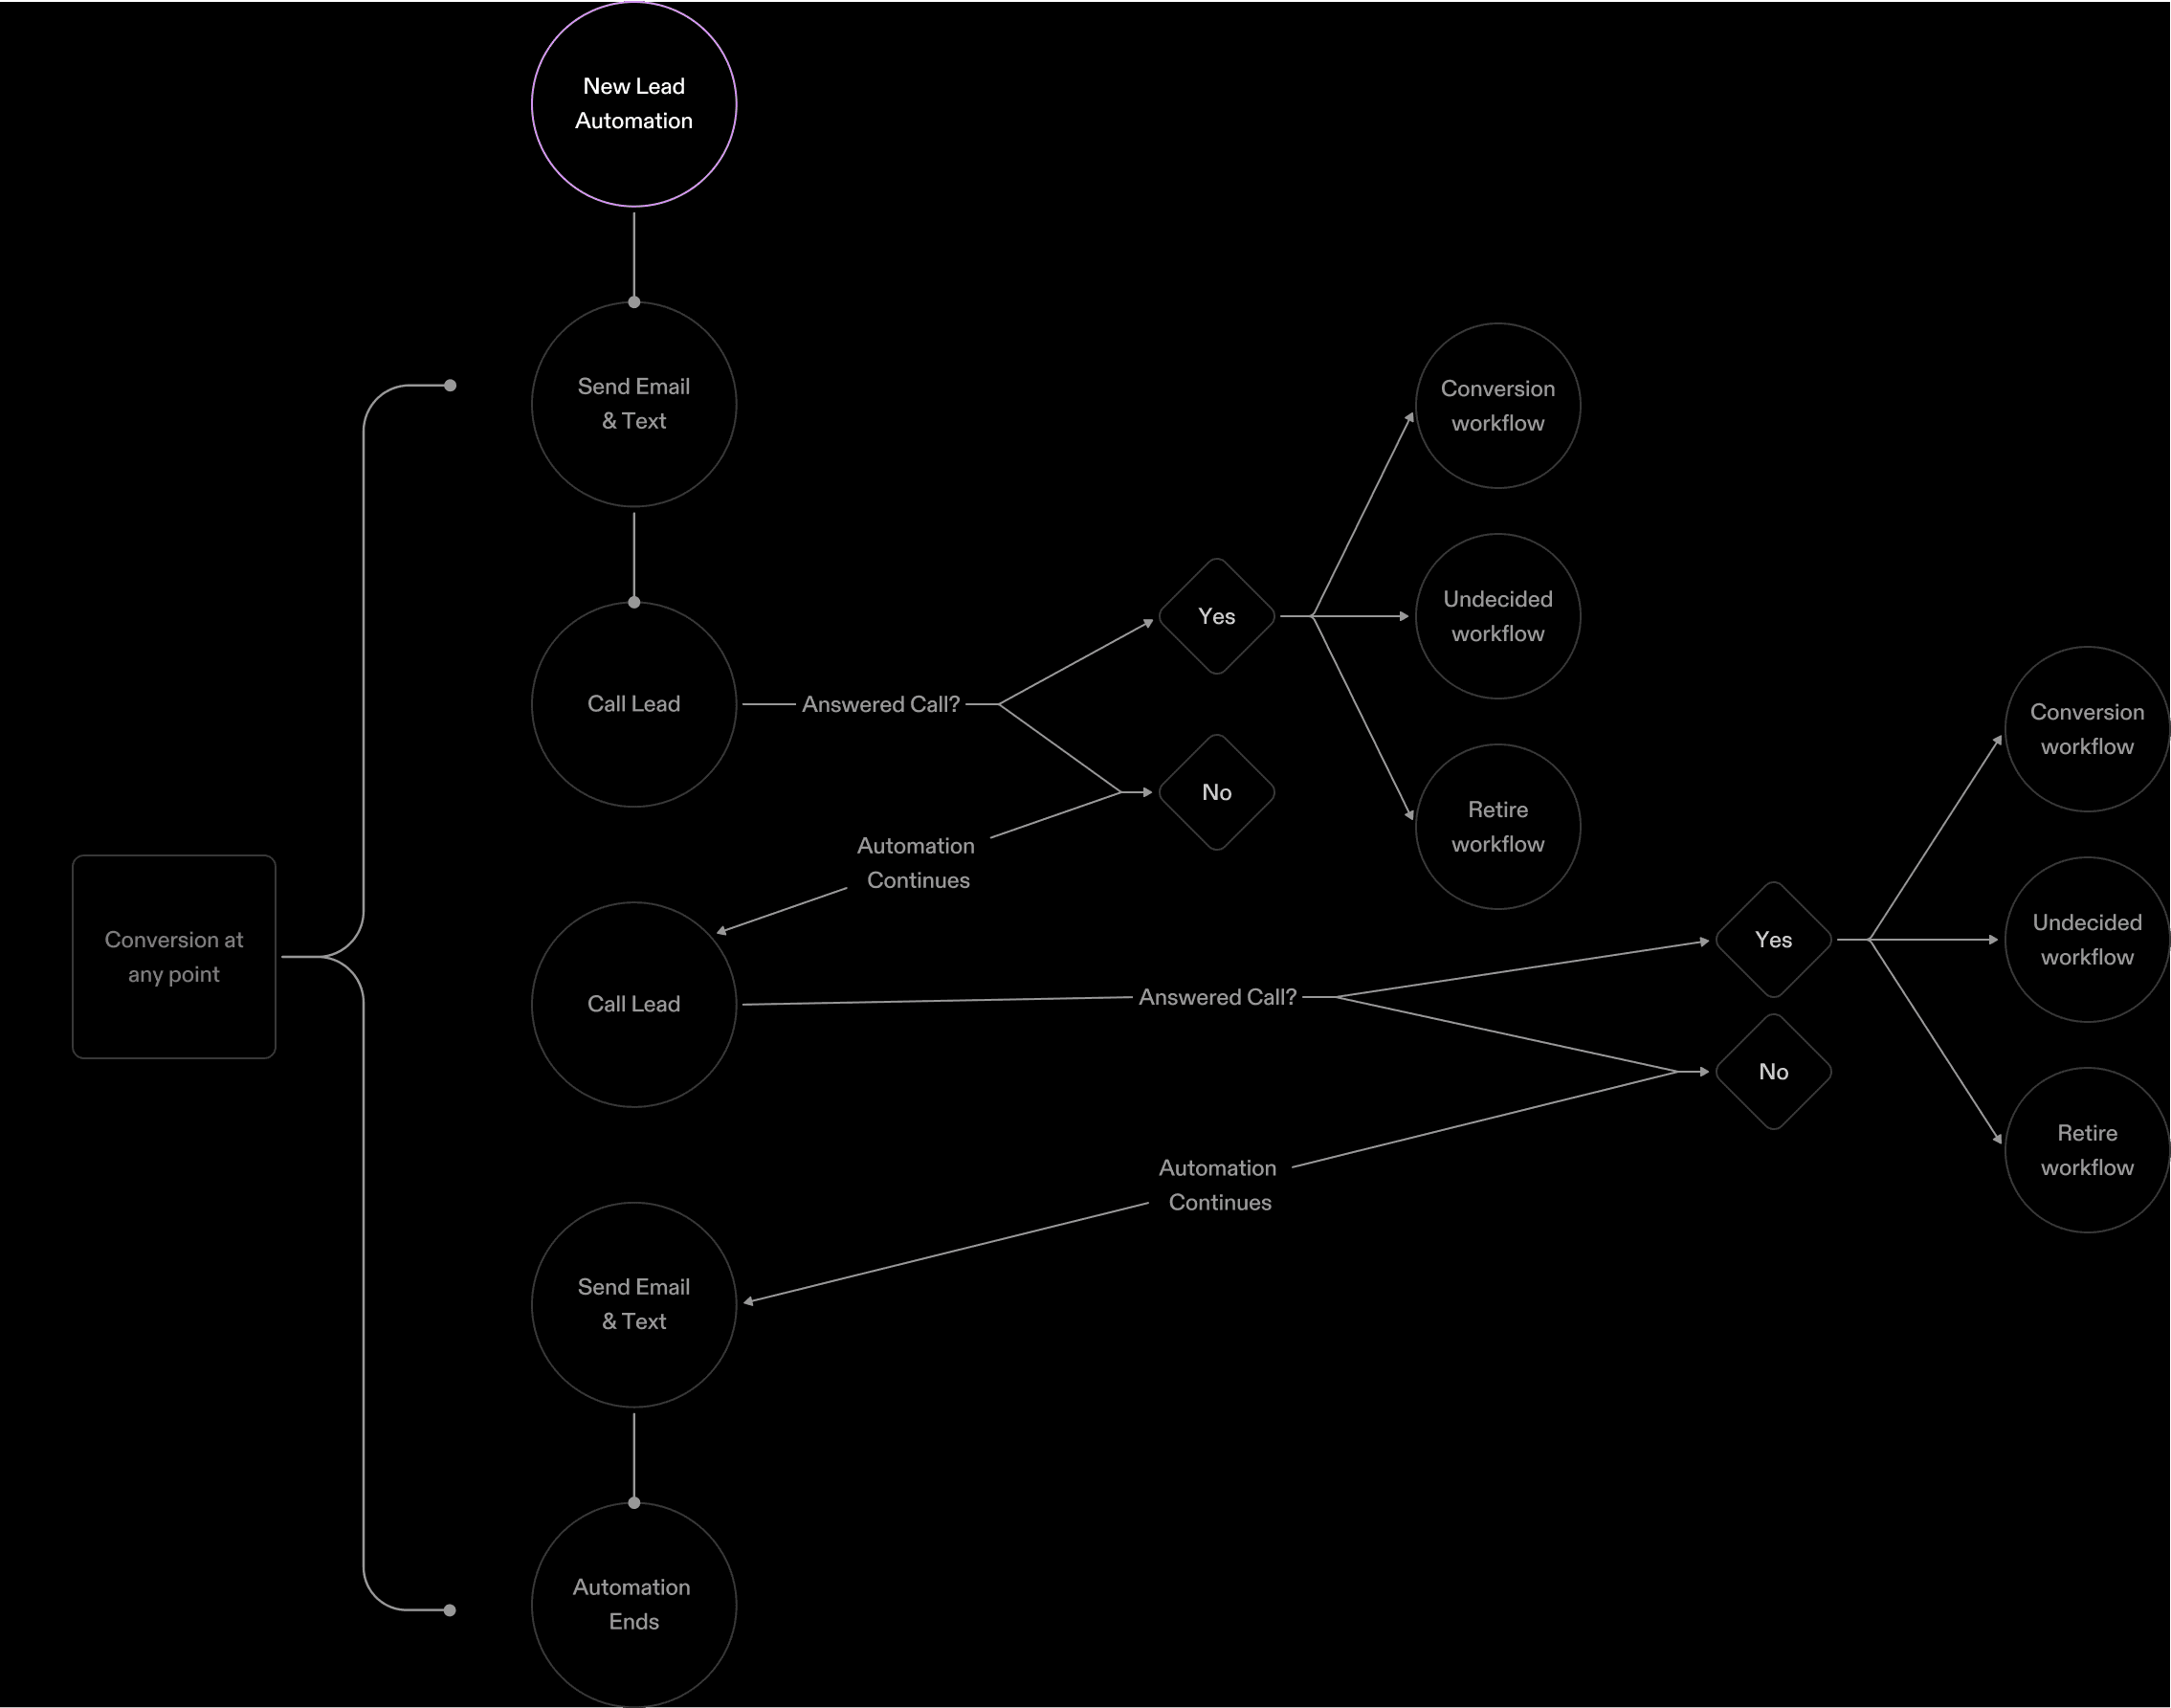
Lead To Tenant
Automation In Action
When there’s a task to call and follow up with a lead, the automation can proceed in one of three directions based on the lead's action—conversion, retire, or undecided. Each of these outcomes acts as a trigger, directing the lead into different automation workflows
Project Reflection
I gained a deeper understanding of product and UX architecture, which is the core of design work, especially in technically complex projects like this. My primary goal was to enable users to engage with their customers more efficiently and boost sales, without getting overwhelmed by a complex tool. By focusing on usability, I ensured that the product was easy to navigate while delivering powerful functionality. This balance between technical depth and user-centric design became a key takeaway for me in this project.


